Installing our WoodGrid® coffered ceiling is easy using the patented Key-Lock joint (shown below) to connect the cross tees to the main runners. WoodGrid can be suspended with metal brackets as shown in Step 2, or it can be suspended with 15/16″ metal T-bar grid. We now run an alignment groove in the back of the grid to receive the T-bar grid, which is recommended for commercial applications. We do not provide the T-bar grid.
Click here for printable page on Installation Procedure.
Key-Lock Joint
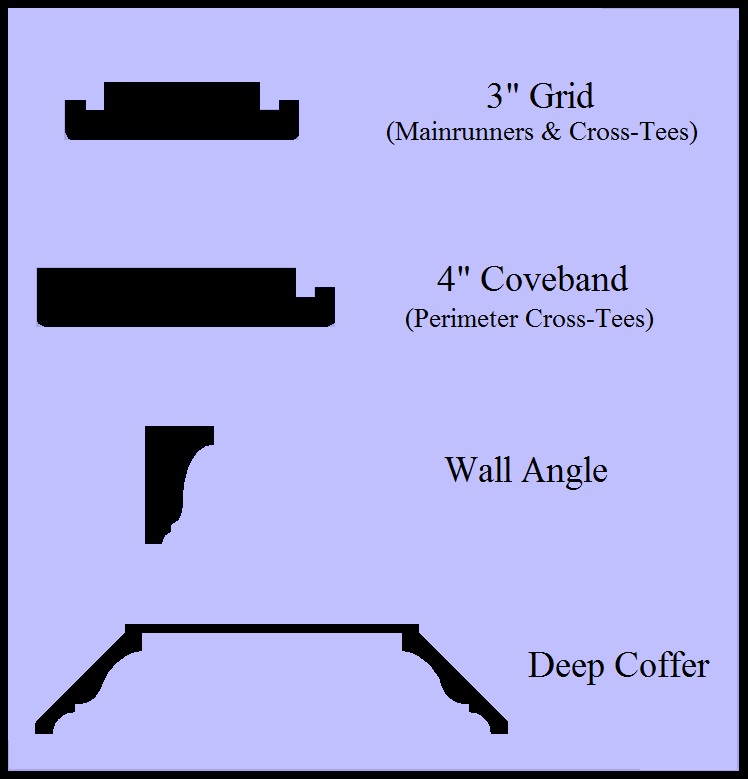
4 BASIC COMPONENTS
STEP BY STEP PROCEDURE (How to Install Grid)
1) ![]()
WALL ANGLE – Putting the Wall Angle up around the perimeter of the room is the first step when installing a coffered ceiling. The ends of the mainrunners and cross tees that go to the wall will rest on top of the wall angle. The cove band cross tees will also lay on top of the wall angle.
Use a laser level to ensure a level guideline. Make sure the top edge of the Wall Angle is at the appropriate distance down from the joists for the depth of coffer to be used. See below.
Click here for printable page on Coffer Depth requirements.
The MEDIUM COFFER style takes up 3 inches of vertical height to the face of the grid. If you have a dry-walled ceiling, you will need about 3 inches of clearance above the back side of the coffer in order to have room to angle the coffer up into place. If you have open joists, you will need about 2 inches clearance to the joists. If you have a very low ceiling and wish to maximize your ceiling height, you can get by with 1 inch of clearance by leaving a cross tee loose (not nailed in), so that you can remove it and insert the coffers thru a larger opening. This is a more time-consuming method for installing the coffers, since the coffers then have to be slid into the proper position. Keep in mind the wall angle measures 1-1/2 inches, so the total is 7.5 inches to the bottom of the wall angle, which may be important to consider with regards to windows or vents. The clearance dimensions are the same for both the 3 inch wide grid and 2 inch wide grid.
The DEEP COFFER style takes up 4 inches of vertical height to the face of the grid. The same rules apply for clearance. For example, if you have a dry-walled ceiling and want to use the Deep Coffer style, you will need to measure down from the ceiling 7 inches to the top edge of the wall angle. To the bottom edge of the wall angle, it would be 8.5 inches.
2) ![]() MAIN RUNNERS – The main runners will usually run crossways of the joists. For shipping purposes, we do not send lengths longer than 14′, with 12′ being the most common. If you need main runners longer than 12′ or 14′, you will need to splice the ends together. We ship these mains with a pre-made splice system for your convenience. We suggest gluing this joint and attaching a block of wood to the backside to reinforce it. Hang the first main runner(s) according to the layout. The first main will either be in the center of the wall, or the center of the wall will be split evenly between two mains.
MAIN RUNNERS – The main runners will usually run crossways of the joists. For shipping purposes, we do not send lengths longer than 14′, with 12′ being the most common. If you need main runners longer than 12′ or 14′, you will need to splice the ends together. We ship these mains with a pre-made splice system for your convenience. We suggest gluing this joint and attaching a block of wood to the backside to reinforce it. Hang the first main runner(s) according to the layout. The first main will either be in the center of the wall, or the center of the wall will be split evenly between two mains.
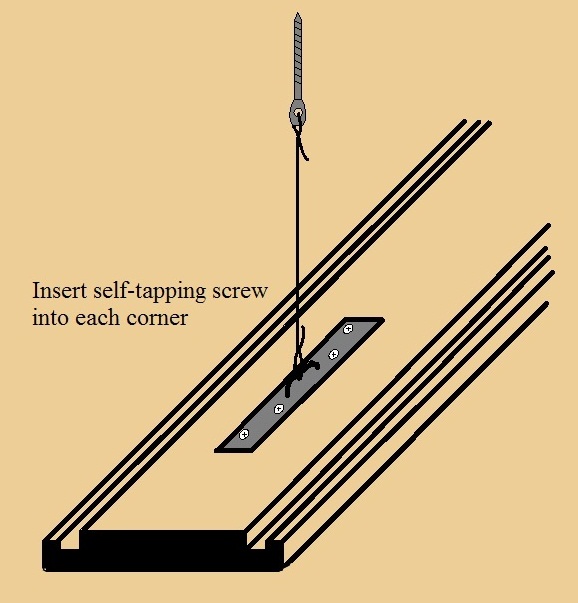
We suggest suspending the mains from every other joist, or maximum 32″ apart. Attach the provided metal hanging brackets to the back of the grid with the 4 screws and suspend with wire from the lag screws that go into the joists. The ends of the main runners will rest on top of the wall angle. Work your way towards the walls by using cross tees to space yourself to the next main runner. Do not nail anything yet. Check the mains in several places to make sure they are level and even, and adjust the wires accordingly.
3) ![]() CROSS TEES – Once the mains are all up, put cross tees in place starting from the center of the room or splitting the center of the wall according to the layout. The cross tees have a special “key-lock” joint that snaps into the mains to hold them in place. You can also use cross tees to space yourself to the next cross tee.
CROSS TEES – Once the mains are all up, put cross tees in place starting from the center of the room or splitting the center of the wall according to the layout. The cross tees have a special “key-lock” joint that snaps into the mains to hold them in place. You can also use cross tees to space yourself to the next cross tee.
Try a couple of the standard center coffers in the grid to make sure everything is fitting correctly. There should be about an 1/8 inch clearance around the coffer. Nail the cross tees at both ends while using other cross tees as spacers, tight up against the main runners to ensure everything is squared up. When you reach the wall, the cross tees will need to be cut to length so they can also rest on top of the wall angle as the main runners do. Standard cross tees are 24″ to 30″ long with the key-lock on both ends. If you are shipped some cross tees that are longer and have the key-lock on one end only, these are to be used as the cross tees that go to the wall where the standard cross tees would not be long enough. Do not nail these cross tees until the cove band is in place.
4) ![]() COVE BAND – The cove band, which is basically a wider cross tee, is used around the perimeter of the ceiling on top of the wall angle between the ends of the mains and cross tees that go to the wall. This fills in the gap between the edge of the coffer and the wall. The edge with the channel faces the interior of the room. The cove band allows the installer to adjust to the walls if they are out-of-square. This can be done by starting the cove band at the wider end of the room. Hold the cove band out away from the wall until it fits the appropriate coffer for that spot. Then continue down the wall towards the end that is narrower. At this point it may be necessary to trim off the back side of the cove band to make it fit. Be sure that the visible edge of the cove band lines up down the wall. Let the reveal of the cove band on the wall angle vary. Standard cove band cross tees are also 24″ to 30″. The longer cove band cross tees are to be used in corners where a standard cross tee will not reach. They should be mitered into the corners. We recommend reinforcing this joint with a biscuit joint or a scab on the back to join both pieces. Do not nail the cove band cross tees in place until you have checked each one with its coffer. You can nail the ends of the main runners at this time also.
COVE BAND – The cove band, which is basically a wider cross tee, is used around the perimeter of the ceiling on top of the wall angle between the ends of the mains and cross tees that go to the wall. This fills in the gap between the edge of the coffer and the wall. The edge with the channel faces the interior of the room. The cove band allows the installer to adjust to the walls if they are out-of-square. This can be done by starting the cove band at the wider end of the room. Hold the cove band out away from the wall until it fits the appropriate coffer for that spot. Then continue down the wall towards the end that is narrower. At this point it may be necessary to trim off the back side of the cove band to make it fit. Be sure that the visible edge of the cove band lines up down the wall. Let the reveal of the cove band on the wall angle vary. Standard cove band cross tees are also 24″ to 30″. The longer cove band cross tees are to be used in corners where a standard cross tee will not reach. They should be mitered into the corners. We recommend reinforcing this joint with a biscuit joint or a scab on the back to join both pieces. Do not nail the cove band cross tees in place until you have checked each one with its coffer. You can nail the ends of the main runners at this time also.
5) STANDARD AND PERIMETER COFFERS – For a typical, rectangular shaped ceiling, all of the perimeter coffers as well as the standard square coffers are shipped with the grid work. Drop the coffers in place according to the layout, making sure the grain is going the right direction. If your ceiling has an odd shape, you will receive all the standard coffers and any rectangular perimeter coffers that we feel can be made in advance. Occasionally, an odd shaped (triangular, L-shaped, curved) coffer will be necessary to complete the ceiling. If it cannot be calculated and made in advance, we will need to have a template of the space, and we will have to make the coffer to fit the template. See info below on how to make coffer templates.
Click here for printable page on How to make templates for coffers (below).
![]()
Watch the installation video below with Dean Johnson of HOMETIME.